
Fun Activities for Kids
More time at home is an opportunity to get creative! 👍


Mini Marshmallow
Shooter


Tree
Scavenger Hunt


Homemade Ice Cream
Materials
-
1 cup cream (half/half)
-
1 tbsp sugar
-
1/4 cup salt
-
2 resealable bags (one larger than the other)
-
Ice
Steps
-
Pour 1 cup cream into the smaller resealable bag.
-
Add the sugar to the cream and seal the bag. Make sure to remove as much air as possible when sealing the bag.
-
In the larger bag, fill it half with ice then add the salt.
-
Place the smaller bag into the larger bag then fill the rest of the larger bag with ice. Seal the large bag.
-
Shake for about 10-min.
-
Remove the small bag from the larger bag and enjoy your ice cream!
Experiment
-
Try adding different flavors to the cream (i.e., vanilla, cocoa powder, jam, etc.)
-
What happens when you don’t add salt to the ice?
-
What happens if you shake for too long? Too little?
-
What happens if you use different creams?


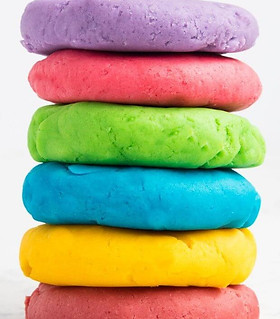
DIY Playdough
Materials
-
1 part body lotion (about 1/2 cup)
-
2 parts corn starch, more as needed (about 1 cup)
-
Food coloring (optional)
Steps
-
Place corn starch in a large bowl (so it doesn't get everywhere) and then add body lotion.
-
Add 2-3 drops of desired food coloring.
-
Mix with hands, kind of like you are kneading bread. It will be pretty sticky at first, but keep mixing it until a firm dough starts to form. If this doesn't happen after about a minute, add in a little more corn starch. You don't want it to be sticky when you are done.
-
Store in a plastic bag and have fun!
© Katie

Materials
-
Wooden skewers
-
1 cup of water
-
2-3 cups of sugar
-
A tall glass or jar
-
Flavouring (optional)
-
Food colouring (optional)
-
Pipe-cleaner/String (optional)
-
Clothespin (optional)
Steps
-
In a saucepan, bring the water to a boil.
-
Pour about 1/4 cup of sugar into the water and stir until it dissolves.
-
Keep adding sugar to the water and stirring until it all dissolves. At one point the sugar will no longer dissolve - that is when the solution is done.
-
Pour the solution into the glass/jar.
-
Place the wooden skewer into the jar.
-
Wait 3-7 days for the sugar to grow.
-
Remove the skewer from the glass/jar and enjoy your handiwork!
Experiment
-
Try growing sugar on different objects - pipe-cleaners, string, etc. See if you can make different shapes!
-
What happens if you don’t let the skewer touch the bottom of the glass/jar?
-
What happens if you roll some sugar on the skewer before adding it to the solution?
-
Try adding different colours and flavourings to see what happens.
Sugar Rocks

Borax Slime
Materials
-
1/4 tsp borax powder
-
1/2 cup clear or white washable PVA school glue
-
1 cup of water divided into 1/2 cups
-
Food coloring, glitter, confetti (optional)
-
2 bowls & 2 spoons
Steps
-
In a bowl, mix the glue, 1/2 cup of water, and food colouring/glitter/confetti.
-
In a separate bowl, mix the borax powder and remainder of the water.
-
Pour the borax solution into the glue mixture.
-
Now the messy part! Using your hands, reach in and start stirring.
-
Eventually, you will be able to remove the slime from the bowl.
-
-
Have fun!
Experiment
-
Don’t add water to the glue. As you mix it with the borax form it into a ball. You will get a bouncy ball instead!

Baking Soda Volcano
Materials
-
3 cups salt
-
6 cups flour
-
3 cups water
-
Bowl
-
Glass jar
-
Baking sheet/Baking dish
-
Vinegar
-
Baking soda
-
Liquid detergent
-
Food colouring (optional)
-
Paint (optional)
Steps
-
Mix the salt, flour and water in a big bowl to make a dough.
-
Form the dough around the glass jar into a volcano shape.
-
Preheat oven to 225 F. Place the volcano onto a baking sheet. Bake the volcano for 4-6h (helps it last longer).
-
Paint the volcano once it has cooled. Acrylic paint works best (optional).
-
Once dry, place the volcano into the baking dish (helps contain the mess).
-
Place 2 drops of liquid detergent with 2 tbsp of baking soda into the glass jar. Add food colouring, if wanted.
-
Pour in 1/2 cup of vinegar and watch the volcano explode! Repeat Steps 6-7 for multiple explosions.

Balloon Hovercraft
Materials
-
Balloon
-
Bottle cap (preferably similar to this which allows it to open and close)
-
Or, use a normal plastic bottle cap with a 0.5-cm hole punched in the middle
-
-
Hot glue gun & hot glue sticks
-
CD (if not available, you can use paper plate with a 1-cm hole cut in the middle)
-
Stickers (optional)
Steps
-
Glue the bottle cap over the center hole of the CD (or a pre-made hole in the paper plate).
-
Decorate the CD/Plate as you'd like!
-
Close the bottle cap (if possible).
-
Blow up a balloon and wrap it over the bottle cap.
-
Put it on the table and open the bottle cap (if possible).
-
Have fun with your hovercraft!

Fudge In a Bag
Materials
-
100g cream cheese
-
3 cups icing Sugar
-
½ cup cocoa powder
-
2 tbsp butter
-
Ziploc bag
Steps
-
Place the cream cheese, icing sugar, cocoa powder, and butter into the Ziploc bag.
-
Seal the Ziploc bag and mix the ingredients together with your hand until it is smooth in consistency.
-
Enjoy!
Experiment
-
Swap out ingredients for different flavours.
-
If adding caramel, take out some cream cheese.
-
If adding peanut butter, take out some butter.
-
-
Add extra goodies to the mixture (i.e. sprinkles, M&Ms, etc).

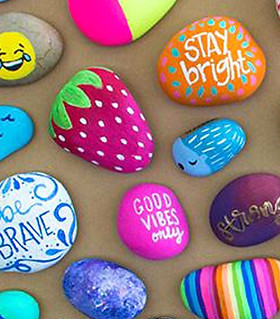
Rock Painting
Materials
-
Rocks: Walk around the neighbourhood and look for smooth rocks.
-
Paint: The best paint to use on rocks is acrylic paint.
-
Brushes: The key to painting details on your rocks is small brush sizes.
-
Markers & Pens: A great option for decorating rocks are paint pens and markers.
-
Markers—If you want to doodle using regular markers, you will first need to paint a while acrylic base on your rocks.
-
Pens for outlining—For creating black outlines around finished designs, consider using micron pens. Just make sure your paint is completely dry beforehand.
-
Liquid Chalk Markers—Depending on the brand, you may need to paint a white acrylic base on your rock first.
-
Chalk Crayons—You can use these to draw directly onto your rocks.
-
-
Sealant: To protect your designs, you will need to use a sealant, either a matte or glossy variety. Spray sealants are recommended as paintable sealants can smear your artwork.
-
To learn more about potential rock-painting materials, click here.
Steps
-
Prep your rocks by washing them outside with a hose, then let them dry.
-
Get creative with your designs, then let the paint or ink dry.
-
Apply a sealant once your paint or ink is completely dry.
-
Consider writing encouraging messages on your rocks and leaving them where someone will find them—they can brighten someone’s day!

Chromatography Butterflies
Materials
-
Non-permanent markers (water soluble works the best)
-
If you don't have markers, non-alcohol based pens work as well
-
-
White coffee filters
-
Cup
-
Water
-
Pipe cleaners
-
String & scissors (optional)
Steps
-
Using the markers, draw designs near the center of the filter. Thick lines work the best. Make sure to leave about 2cm around the center blank.
-
Fill the cup about ¼ to ½ with water. Place the blank center of the coffee filter into the water, just deep enough so that part of the center is submerged without touching the first line of markers.
-
Wait for the coffee filter to absorb the water. You can watch it as it separates the ink.
-
Once the water has reached the edge of the filter, carefully remove the filter from the cup and place it aside to dry.
-
Once the filter has dried, wrap a pipe cleaner in the center of the filter. Curl the tips to make antennas.
-
Cut a piece of string and attach it to the pipe cleaner. Hang it up in the window and let it flutter in the wind (optional).

Bug Hunt Game
Materials
-
A magnifying glass
-
A hunting ground - backyard, garden, or local park
-
A notebook and pens for keeping track of what you find and where
-
A field guide to bugs and/or a smartphone (optional but recommended)
How to Play
-
Start by finding a place to look for bugs. Backyard gardens or nearby green spaces are obvious places to start.
-
The goal is to find and observe as many bugs as possible. The kid who finds the most wins!
-
Don't touch the bugs you find! This will help avoid any potential bites/stings.
-
-
When you’re bug hunting, search as a team and in the same place. Ask your accompanying adult to flip over logs, stones, and objects to ensure everybody is safe.
-
Start with flowering plants ⏤ they’re essentially insect hotels when in bloom ⏤ before moving to areas of exposed soil, moist dirt, or plant beds covered with wood chips or straw. Don’t forget the grass too!
-
Butterflies, bees, wasps and the like are among the most common finds, but when you look closer, you’re likely to see an incredible variety of other insects that thrive by blending in ⏤ leafhoppers, aphids & walking sticks for example.
-
A magnifying glass can be especially useful here, as some insects are just flat-out tiny!
-
-
For each bug that you find, scribble down some details about it, including: what it looked like, how many legs/wings it had, where you found it, what it was doing, and what you think it eats. Sketch out a quick picture too.
-
If you’re having trouble identifying a bug, don’t worry — just snap a photo with a smartphone (or do a quick search), narrow the bug down to a more general group (beetles, ants, bees, etc.), and move on.
-
Remember: the object is to find many bugs. Don’t get bogged down trying to identify each one on the spot — you can do that later around the computer.
-

Homemade Gummy Bears
Materials
-
1 package of JELLO (85g/3 oz size)
-
1 tablespoon of gelatin
-
1/2 cup of water
-
Gummy bear molds with dropper
Steps
-
Pour 1/2 cup of water into a saucepan set on low heat.
-
Add 1 package of Jello (85 size/3 oz size).
-
Add 1 tablespoon of gelatin.
-
Mix until all dissolved and then remove from heat.
-
Using the dropper, add mixture into your molds.
-
TIP: Try to avoid getting bubbles in your dropper when placing in the mold. If you end up with bubbles on the top, that’s OK, but the bubbles will solidify that way. Bubbly ones will still taste good!
-
-
Place in fridge for 30 minutes or until solidified.
-
Enjoy!


DIY Spa Day
Oatmeal Face Mask
Materials
-
½ cup oatmeal, uncooked
-
1/4 to ½ cup water
-
½ cup milk
-
1 tablespoon pure honey
Steps
-
In a small saucepan over medium heat, cook oatmeal, water, milk and honey for 5 to 6 minutes, stirring frequently with a spatula or spoon. Remove from heat and allow to cool.
-
Massage a thick layer of plain honey all over your clean face and neck before applying mask.
-
Apply mask to your face with upward strokes. Lie down and relax for 10 to 15 minutes. Remove and rinse by using a soft facial washcloth and warm water.
-
And that’s it- fresh, clean and moisturized skin. It doesn’t get any easier than that!
https://www.somewhatsimple.com/oatmeal-and-honey-facial-mask/
~
Olive Oil Lip Scrub
Materials
-
1 tsp of brown sugar
-
1 tsp of white sugar
-
1 tsp of honey
-
1/2 tsp of olive oil
Steps
-
Mix all of the ingredients together in a small bowl. You can add more or less of some ingredients to get the consistency how you like. Store in a small container.
-
Apply the scrub to your lips and massage it around for about 20 seconds or so. Wipe off for instantly smoother lips!
https://www.thewonderforest.com/2014/03/diy-homemade-natural-lip-scrub.html
Brown Sugar Foot Scrub
Materials
-
1 tablespoon olive oil
-
1 tablespoon brown sugar
-
1 tablespoon baking soda
Steps
-
Mix all three ingredients in a small bowl until combined.
-
Apply the scrub to your feet (and other dry places, like your elbows), work it gently onto your skin, and then rinse well.
-
To fill a half-pint mason jar, combine 10 tablespoons of each ingredient.
https://oldsaltfarm.com/diy-brown-sugar-foot-scrub-recipe/

Milk Experiment
Materials
-
A shallow dish:
-
A clear dish works best as you can see what's happening beneath the surface
-
However, any other dish or dinner plate works just as fine
-
-
Food coloring in four different colors
-
Milk with a high fat content (half-and-half or whole milk work best)
-
Liquid dish-washing soap
-
A clean cotton swab
Steps
-
Pour enough milk into the dish to just cover the bottom. The layer of milk should have a height of about ¼ “.
-
Allow the milk to settle.
-
-
Add one drop of each of the food colors to the milk. The drops should be close together near the center of the dish.
-
Touch the colored milk at the center of the dish with the tip of the cotton swab. Do not stir the mixture!
-
Note your observation.
-
-
Put a drop of the dish soap at the other end of the cotton swab.
-
Place the soapy tip of the swab back at the center of the milk and hold it there for 10-15 seconds.
-
Note your observation.
-
The color should churn out from the bottom of the plate to the surface.
-
-
Add another drop of soap to the cotton swab and test the phenomenon again.
-
Place the cotton swab in different parts of the milk and continue your observations.
-
On touching the liquid at the edge of the plate, the color should mix and move around making cool patterns.
-
https://www.scienceprojectideas.org/milk-and-food-coloring.htm

DIY Lava Lamp
Materials
-
Flask or bottle
-
Vegetable oil
-
Water
-
Food coloring (whatever colors you like)
-
Alka-seltzer
Steps
-
Fill the flask most of the way with vegetable oil.
-
Fill the rest of the flask with water. The water will sink to the bottom under the oil.
-
Add a few drops of food coloring. The food coloring is water-based, so it will also sink and color the water that is now at the bottom of the flask.
-
Break an alka-seltzer tablet into a few small pieces and drop them in the flask one at a time.
-
Watch your lava lamp erupt into activity! As the reaction slows down, simply add more alka-seltzer.
https://www.homesciencetools.com/article/how-to-make-a-homemade-


Get-Creative Challenges
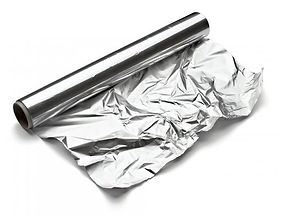
Aluminum Boat
Materials
-
Coins
-
Aluminum foil
-
Large bowl
-
Water
Challenge
-
Make an aluminum boat that will hold the most coins without sinking!
~
Straw Tower
Materials
-
Plastic Straw
-
Scissors
Challenge
-
Using nothing but straws, build the tallest tower!
-
Option: Trying using only paper.
-
Option: Add a 1-metre limit of tape (to make the challenge easier).
-
~
Rube Goldberg Machine
Materials
-
Anything in the house
Challenge
-
Build a Rube Goldberg Machine to raise a flag at the very end.
-
Bonus points if it spans the whole house!
-
If you need inspiration, click here.
~
Egg Drop
Materials
-
Anything in the house
Challenge
-
Build a contraption to prevent an egg from breaking when dropped.
-
Option: Limit the amount or type of materials available.
-
For example, use only items gathered from outside.
-

Homemade Fruit Roll-ups
Materials
-
5 cups berries
-
1/4 cup honey
-
2 tbsp lemon juice
Steps
-
Preheat oven to 170 degrees Fahrenheit (or the lowest temperature your oven will go).
-
Line a large (17 x 12 inch) rimmed baking pan with parchment paper or a silicone baking mat.
-
Rinse berries and remove stems from berries, if necessary.
-
In a blender or food processor, add the berries, honey and lemon juice. Blend until smooth.
-
For a smooth finish, pour puree through a fine mesh strainer to remove seeds.
-
-
Pour pureed fruit onto baking sheet and spread evenly over the entire pan.
-
Place pan in oven and bake for 5-6 hours, rotating the pan halfway through the drying process. Remove from oven when the puree has set and is no longer sticky.
-
Allow the pan to cool completely. If you used a silicone baking mat, gently peel the cooled fruit leather and transfer onto a large sheet of wax paper.
-
Cut the paper-lined fruit leather into long strips and roll.
-
Store fruit roll-ups in an airtight container for up to 2 weeks.
-
https://www.thebestideasforkids.com/homemade-fruit-roll-ups/

DIY Recycled Crayons
Materials
-
Old crayons (or you can use new)
-
Silicone mold
-
Oven
-
Cookie sheet
Steps
-
Pre-heat oven to 350 degrees.
-
Peel labels off the crayons.
-
If difficult to remove, you may need to soak them in water first.
-
-
Break the crayons into small pieces and place in mold. Put the mold on a cookie sheet.
-
Place in oven for 3-5 min.
-
It may take more or less time depending on your oven and/or type of crayons.
-
-
When the crayons are fully melted, place the mold in the freezer on a flat surface for 20 min until cool and solid. Remove from mold and enjoy!


Water Balloon Baseball
Materials
-
Lots of filled water balloons
-
Bucket
-
Plastic baseball bat
-
Optional: hula hoops for bases
-
Optional: orange cone for t-ball
-
Optional: slip-and-slide
Steps
-
Set up the playing field as a standard baseball diamond, using hula hoops as bases (optional).
-
Place a bucket of filled water balloons on the "pitcher's mound."
-
One person at a time stands at "home plate" to bat.
-
The pitcher throws one balloon at a time to the batter.
-
The pitcher throws balloons until the batter hits and breaks one.
-
Alternatively, use an orange cone for t-ball.
-
-
After the batter hits and breaks a balloon, they run to first base.
-
As they run, the pitcher tries to tag them with a balloon before they get to first base.
-
The pitcher gets one throw per base (one throw from home to 1st, one throw from 1st to 2nd, etc).
-
If the water balloon hits the runner, they are out. If the water balloon misses the runner, they keep running.
-
The runner can choose to run to the next base or stay on the base they are on.
-
-
If the runner gets all the way back to home base without being hit by a water balloon, they get a run.
-
Optional: Use a slip-and-slide for sliding to home base.
-
Keep score if you'd like, or just play for fun!
-
Variation
-
Instead of playing a game of baseball, set up for batting practice:
-
Place a bucket of filled water balloons on the "pitcher's mound."
-
One person at a time stands at "home plate" to bat.
-
The pitcher throws one balloon at a time to the batter.
-
The pitcher throws balloons until the batter hits and breaks one.
-
Optional: Whoever breaks the most balloons wins.
-


Mini Marshmallow Shooter
Materials
-
Paper or plastic cups (9” cup or yogurt cup)
-
Balloons (12”)
-
Mini marshmallows (or pom poms)
-
Scissors
Steps
-
Cut the bottom part off of your paper or plastic cup.
-
Tie a knot at the end of your balloon and cut off about ½” from the other end.
-
Now stretch the balloon over the bottom of the cup.
-
Put your marshmallow inside the cup on the knotted center, aim the cup away from you, pull back on the outer knot and launch away!
http://www.cometogetherkids.com/2011/09/mini-marshmallow-shooters-or-pom-pom.html#

Tree Scavenger Hunt
Materials
-
List of local tree species
-
Photos of the trees you'd like to find
-
Copy and paste photos from Google Images into a Word document.
-
Find images of the larger tree, as well as the leaves, bark, fruit, and other distinguishing features.
-
A tree identification book is ideal! Key identifying features will be included and you can take it with you.
-
-
A pen or marker
Steps
-
Go see how many tree species you can find!
- Explore your back yard, a park, or a hiking trail.
- Get to know the trees you encounter. Use your eyes, hands, and even your nose!
-
As you find each tree species, cross them off your list.
-
For those trees you didn't find, do some more research when you get home. Find out what habitats the trees you didn't find prefer, and plan your next hunt accordingly.
-
Have fun!

S'More Pops
Materials
-
Milk chocolate bar
-
Large marshmallows
-
Graham crackers
-
Skinny popsicle sticks (or shish-kebab sticks)
-
Ziploc bag
-
Rolling pin
-
Microwave safe bowl
-
Parchment paper
Steps
-
Crush about 10 graham crackers by placing them in the Ziploc bag and rolling over them with the rolling pin.
-
Break up the chocolate bar into the bowl and microwave for 20-second intervals until it's fully melted.
-
Chocolate burns easily, so stir it between each 20-second round in the microwave.
-
-
Push the popsicle sticks about halfway into the marshmallows, flat side down. Start with a dozen and make more if you have melted chocolate left.
-
Dunk the marshmallows in the chocolate, then roll them in the crushed graham crackers, and place them on the parchment paper to harden up before eating (at least 5 minutes).
-
Enjoy!

Cookie Gram
Materials
-
5 tsp butter, softened
-
1 tsp milk
-
¼ cup all-purpose flour
-
Dash of salt
-
2 tbsp brown sugar
-
¼ tsp vanilla
-
¼ tsp baking soda
-
¼ cup quick-cooking oats
Steps
-
Preheat oven to 350 degrees.
-
In a small bowl, cream butter and sugar until light and fluffy.
-
Mix in the milk and vanilla, then add the remaining ingredients.
-
Drop mixture on a lightly greased cookie sheet (or parchment paper). Flatten dough to ¼ inch thickness and create your cookie gram shape.
-
Ideas: a tie for father’s day, a big circle for a happy face, a heart, etc. Use your imagination!
-
-
Bake at 350 degrees for approx. 15 minutes or until edges slightly brown.
-
Let cool on pan for 15 minutes before removing.
-
-
Once cool, decorate with a special message to a loved one and enjoy!

Marbleized Colour Prints
Materials
-
Baking sheet
-
Shaving cream
-
Food colouring (liquid or icing gels)
-
Eye droppers or pipettes (if you are using icing gels)
-
Stir sticks (craft sticks, skewers, pipe cleaners, etc.)
-
Plastic gift card or a sturdy piece of cardboard (for scrapping)
-
Something to make your print on:
-
White paper, card-stock or cardboard
-
Steps
-
Squirt a generous amount of shaving cream onto a baking sheet.
-
With an expired gift card or a sturdy piece of cardboard, smooth the shaving cream over the surface of the pan.
-
If you’re using liquid food colouring, simply dribble your colours all over the surface of the shaving cream.
-
If you’re using gels, mix each colour with a bit of water, (about 1 part gel to 3 parts water). Then use droppers to dribble the colours all over the shaving cream.
-
-
Using your stir stick, swirl around the color droplets to create your own design.
-
Now, take your white paper or cardboard, or whatever it is you’re making your print on, and gently press it into the marbled shaving cream. Don’t press it in deep because you don’t want to disturb the pattern of colours.
-
Lift your paper off, and let it sit for a half a minute or so. Then, gently scrape the shaving cream off to reveal your print!
Variation
-
Use this technique for creating marbleized eggs as an Easter activity.
https://happyhooligans.ca/shaving-cream-and-food-colouring-2/

Origami Jumping Frogs
Materials
-
Origami paper
-
A square piece of any paper will work, but origami paper works best.
-
If you use 6 x 6 inch paper, your frog will be 2 x 2 inches.
-
Steps
-
When you see arrows, those are showing you which direction you should fold the paper, and the dotted lines show you the line the fold will make. Remember, you are not folding to match the paper up with the dotted line, you are folding ON the dotted line:
-
Once your frog is folded, press down on the folded “legs” with the tip of your finger, then quickly slide your finger off to make the frog jump.
-
Depending on how hard you push the legs down, you might be able to get the origami frog to make one perfect flip in the air and land on its feet again.
-
Try to jump the frogs into targets, or see whose frog jumps the furthest.
-
https://www.itsalwaysautumn.com/origami-jumping-frogs-easy-folding-instructions.html

