
MORE Fun Activities for Kids
More time at home is an opportunity to get creative! 👍


Mason Jar Ice Cream
Materials
-
1 medium-sized mason jar
-
1 cup heavy cream
-
1 1/2 tbsp granulated sugar
-
1 1/2 tsp vanilla extract
-
1/4 tsp salt
Steps
-
Put all the ingredients in your mason jar and tightly secure the lid.
-
Now shake the mason jar for 3-5 minutes or until the mixture has almost doubled in size.
-
When your mixture has the consistency of cake batter and coats your spoon, you've shaken it enough.
-
-
If you'd like plain vanilla ice cream, your jar is ready to put in the freezer. If you'd like a different flavour, now is the time to get creative! Use a spatula to scoop the mixture into a bowl, then stir in your additions.
-
You might consider adding berries, chocolate chips, dried fruit, nuts, etc. The possibilities are endless!
-
-
Once your mixture is flavoured, put the mixture back in the jar and place it in the freezer for at least 3 hours.
-
Serve in a bowl or on a cone. Enjoy!
https://www.youtube.com/watch?v=waTnj3c6fbk&feature=youtu.be

Bannock Recipe
Materials
-
3 cups all-purpose flour
-
1 tsp salt
-
2 tbsp baking powder
-
1/4 cup butter, melted
-
1 1/2 cups water
Steps
-
Mix the flour, salt, and baking powder together in a large bowl. Pour the melted butter and water over the flour mixture, then stir with a fork to make a ball.
-
Try throwing in blueberries or raisins for added flavor.
-
-
Turn the dough out on a lightly floured surface and knead gently about 10 times. Pat into a flat circle 3/4 to 1 inch thick.
-
Cook in a greased frying pan over medium heat, allowing about 15 minutes for each side. Use two lifters for easy turning.
-
May also be baked on a greased baking sheet at 350 degrees for 25 to 30 minutes.
-
-
Serve with jam or have it plain. Enjoy!

Sprouting Seeds
Materials
-
Clear jar or cup
-
Seeds (beans work the best)
-
Paper towel
-
Spray bottle with water
Steps
-
Place the paper towel into the jar/cup, but do not pack it in.
-
Evenly space out the seeds along the edge of the jar/cup (between the jar/cup and the paper towel).
-
Using the spray bottle, gently moisten the paper towel. Do not soak it.
-
Place the jar/cup in a well-lit area.
-
Spray the paper towel regularly to keep it moist.
-
Watch the seeds grow!
-
Once the seeds have sprouted leaves, plant them in soil to allow them to continue growing.
-
Experiment
-
Try different kinds of seeds. Do all seeds grow the same way? At the same speed?
-
Have multiple jars/cups of seeds growing and place them in different environments (more sun, less sun; cold, hot). Do they grow differently? Does the environment affect how fast/well the seeds grow?
-
Consider documenting your findings!
-


Solar Oven
Materials
-
Cardboard box with lid
-
Scissors
-
Aluminum foil
-
Black paper
-
Plastic wrap
-
Pencil (or a stick or skewer)
-
Tape
-
Ingredients to make s'mores
-
Graham crackers, marshmallows & chocolate
-
Steps
-
Cover the inside of the box and lid with aluminum foil, shiny side facing out. Tape the foil in place.
-
Cut the top of the lid to make a flap, place the black piece of paper along the bottom of the box, and cover the hole with plastic wrap. (Secure the plastic wrap in place with tape, if needed).
-
On a sunny day, bring the oven outside. Place your assembled s'mores inside the box.
-
Place on the lid and prop it open with your pencil/stick/skewer. Make sure the opening is facing the sun!
-
Wait about 30-min to 1-hour, (timing depends on intensity of sun), then take out the s'mores and enjoy!
Experiment
-
Try cooking different camp foods to see what works.


DIY Bird Feeders (allergy warning)
Peanut Butter Feeder
Materials
-
Bird seed
-
Peanut butter
-
Pinecone OR toilet paper roll OR large stick
-
String
Steps
-
Cover the pinecone/toilet paper roll/large stick with lots of peanut butter.
-
Cover the peanut-buttered pinecone with bird seeds. Make sure to pack it in.
-
Tie a piece of string to the pinecone/toilet paper roll/large stick. Make sure to think about how the bird will sit on it once you hang it up. You may require multiple pieces of string.
-
Hang the bird feeder from a tree or a post & watch the birds enjoy the food!
Cookie Cutter Feeder
Materials
-
Corn syrup
-
Bird seed
-
Pen
-
Cookie Cutter
-
String
Steps
-
Slowly mix the corn syrup and the bird seed together. The mixture should be just sticky enough to stick together, but not runny with syrup.
-
Place the bird seed mixture into the cookie cutter. Pack it tightly.
-
Place a pen through the tightly packed mixture to make a hole for a string to go through. Allow it to dry for a few days.
-
Carefully remove the bird feed from the cookie cutter.
-
Draw a piece of string through the hole created by the pen.
-
Hang the bird feeder from a tree or a post & watch the birds enjoy the food!

Bubble Snake
Materials
-
Dish soap
-
Water
-
Plastic bottle
-
Cloth
-
Elastic
-
Large bowl
Steps
-
Carefully cut the bottom of the plastic bottle.
-
Attach the cloth to the bottle with an elastic.
-
In a large bowl, mix the dish soap and water together (1-tbsp dish soap to 1-cup water).
-
Dip the cloth end into the mixture, then take it out and blow really hard into the bottle opening.
-
Watch your bubble snake emerge!
Experiment
-
Try making the longest bubble snake!
-
Make designs with the bubble snake (for example, a star).

Pop Geyser
Materials
-
500-ml or 2-L bottle of Coke/Diet Coke
-
Mentos
-
Paper
Steps
-
Place the bottle of pop on a flat surface OUTSIDE. This experiment will cause a sticky mess!
-
Try to stabilize the bottle as best as possible (e.g., rocks, dirt, etc.).
-
-
Open the pop bottle.
-
Place about 3-7 Mentos, (depending on the size of bottle you use), onto a sheet of paper.
-
BE PREPARED TO RUN FAST!
-
Using the paper to make a makeshift funnel/track for the Mentos, pour them into the bottle and run.
-
Sit back and watch the spectacle!
-
The leftover pop is still drinkable after the explosion - it just won’t have any fizz left.
-
Experiment
-
Try this with different kinds of pop to see which works the best.
-
There are geyser tube kits online if you want to be at a safe distance to trigger it.


Frozen Monkey Treats
Materials
-
3 medium bananas
-
Toothpicks
-
1 cup dark chocolate chips
-
2 teaspoons coconut oil or shortening
-
Toppings: chopped peanuts, shredded coconut, colored sprinkles, etc.
-
To toast the coconut, bake in a shallow pan in a 350° oven for 3-5 minutes.
-
Steps
-
Cut each banana crosswise into 6 pieces (about 1 inch).
-
Insert a toothpick into each piece and transfer onto a waxed paper-lined baking sheet.
-
Freeze until completely firm - about 1 hour.
-
-
Combine the chocolate and coconut oil/shortening in the microwave for 20-second intervals until it's fully melted.
-
Chocolate burns easily, so stir it between each 20-second round in the microwave.
-
-
Dip the banana pieces in the chocolate mixture, allowing the excess to drip off. Now dip them in the toppings as desired, placing them back on the baking sheet when you're done.
-
Freeze for at least 30 minutes before serving.
-
Enjoy!
-
https://www.tasteofhome.com/recipes/frozen-chocolate-monkey-treats/

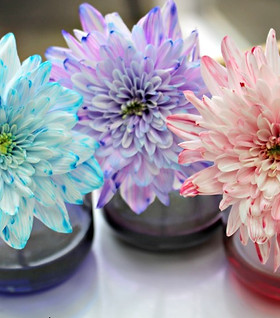
Colour Changing Flowers
Materials
-
Freshly picked flowers (white or lightly coloured petals work best)
-
Note: this experiment won't work so well if the flowers are beginning to wilt
-
-
Water
-
Glass jars or cups
-
Scissors
-
Food colouring
Steps
-
Go outside and pick some flowers.
-
Fill several jars or cups halfway full with water.
-
Add some food colouring to each cup (3-10 drops, depending on how colourful you want your flowers).
-
Cut the flower stems diagonally across the bottom, then place 1 flower in each cup.
-
After a few hours, your flowers will begin changing colour. Leave them overnight to see deeper colour changes.
Experiment
-
Try different kinds of flowers and see which ones work the best
-
Cut lengthwise up the stems and have each end in a different colour. What happens?


Strawberry Lime Smoothies
Materials
-
1 cup strawberry yogurt
-
Or substitute with plain yogurt
-
-
1/2 cup 2% milk
-
2 cups fresh strawberries (tops removed)
-
2 to 4 tablespoons lime juice
-
1/4 teaspoon ground cinnamon
-
2 tablespoons honey
-
For a less-sweet treat, reduce or remove the honey
-
Steps
-
Process all ingredients in a covered blender until smooth.
-
Enjoy!

Balloon Rocket
Materials
-
Balloon
-
Straw
-
Tape
-
String
Steps
-
Attach a piece of string to one end of the room (for example, tied to a doorknob or chair, or taped to the wall).
-
Slide the straw onto the string and attach the string to the other end of the room.
-
Blow up a balloon, but don’t tie it up: keep the end pinched as you tape it to the straw.
-
Let go of the balloon and watch the rocket go!
Experiment
-
Try different kinds of string, straws and balloons. Which is the fastest? Slowest?
-
Attach fins to the straws and a cone to the balloon to make it look more like a rocket. What happens?

PB&J on a Stick
Materials
-
2 peanut butter & jelly sandwiches
-
4 wooden skewers (5-6 inches)
-
1 cup of seedless red or green grapes
-
1 small banana, sliced
Steps
-
Cut sandwiches into 1-inch squares.
-
Alternately thread grapes, sandwich squares and banana slices onto each skewer.
-
Serve immediately.
https://www.tasteofhome.com/recipes/pbj-on-a-stick/


Hot Ice Experiment
Materials
-
4 cups vinegar
-
4 tablespoon baking soda
-
Saucepan
-
Jar
-
Wooden spoon
Steps
-
Pour the vinegar into the saucepan.
-
Carefully mix in the baking soda (it will fizz over if you do it too fast).
-
Make sure everything is fully dissolved.
-
-
On low heat, slowly boil the solution until a thin film forms.
-
Carefully pour the solution into a jar. Scoop out any floating crystals and keep those for later.
-
Cover the jar with a lid or plastic wrap and let it cool.
-
Works best if cooled in fridge.
-
-
Once cool you can try:
-
Sticking an object in;
-
Sticking your hand in;
-
Pouring the liquid over the excess floating crystals you have kept.
-


Crunchy Granola Pretzel Sticks
Materials
-
1 package (12 ounces) dark chocolate chips
-
24 pretzel rods
-
1 cup granola without raisins
Steps
-
In a glass bowl or 2-cup measuring cup, melt the chocolate chips in the microwave for 20-second intervals until fully melted. Stir until smooth.
-
Chocolate burns easily, so stir it between each 20-second round in the microwave.
-
-
Pour the melted chocolate into one side of a large shallow dish.
-
Roll each pretzel halfway into chocolate. Allow the excess coating to drip off, then sprinkle the pretzels with granola. Place on waxed paper and let set (until chocolate hardens).
-
Store in an airtight container.
-
Enjoy!
-
https://www.tasteofhome.com/recipes/crunchy-granola-pretzel-sticks/